Okra Fritters

Since the Produce Junction opened up near us, I have become a produce addict. Maybe that would be better said:  a “Junction junky”?  Two weeks ago, I discovered okra. I had heard of okra, especially in a Bill Smithers song: “I’ve got okra, enough to choke ya, but I’ve got no love today!” But had never experienced it up close and personal before. I purchased some and included it in the soup for the homeless men on the street. The next week, I got more and used a bunch in the turkey vegetable gumbo for the street and used some in a hamburger, noodle, veggie soup for us. They were both terrific! Don’t ask for the recipe. I didn’t follow one and I can’t recall what all I put into them.

I got to thinking, with Great Lent coming, about how to make lenten food with fewer carbohydrates for diabetics. I really like falafels, but they are pure carbs. Check out  the nutritional benefits of okra. They are a great source of vitamins A, C and K, as well as antioxidants and fiber. Okra is sticky and very nutritious, so I thought I would experiment. What resulted was not exactly falafel-like, but edible and tasty nonetheless. Here’s the recipe (as near as I can remember it from last night):

Ingredients:

  • about 1 pound of 3 to 4 inch okra
  • 1 15 oz. can of garbanzo beans, drained
  • about 3 inches of celery root at about 1-1/4″ diameter
  • about 1/2  cup flour
  • one head of garlic, cloves peeled
  • 1/4 teaspoon cumin
  • 1/4 teaspoon salt
  • 1/2 teaspoon ground coriander
  • 5 twists of freshly ground black pepper
  • 1/2 teaspoon of parsley flakes
  • olive oil

Wash the okra. Throw all of the ingredients except the oil into a food processor and run it until they are thoroughly chopped and mixed and you have sticky greenish glop. Heat up 1/4″ to 1/2″ of olive oil in a large skillet. Use a tablespoon or two to scoop and plop the mixture into the hot oil. Fry one side, then turn and flatten them to fry the other. Fry them until you see more brown than green.

Enjoy!

New Icon Corner

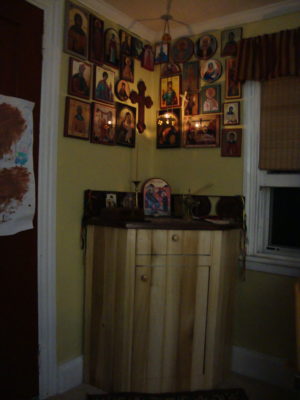
Bright cornerI finally finished our new icon corner. The two things in a house that a man should make himself, even if he makes nothing else, are the front door and a proper bright corner. A bright corner is a special place for prayer for the family. It is called the bright corner because it faces the rising sun and because it is where the icons are. Icons are windows to heaven, hence “bright”. It is either in a corner or along a wall, if possible toward the East. As Orthodox Christians, we face East to pray, because Christ was called the Sun of Righteousness in Malachi 4:2. We orient (face East) toward the rising sun as we anticipate Christ’s second coming in glory.

The bright corner is where morning, noon and evening prayers are said. There are many variations on the bright corner. Ours is not to be taken as typical or normative, but it works for us. Our bright corner is in the East corner of our den. There is a Cross on the wall near the corner. To its left is an icon of the Theotokos. To its right is an icon of Christ. This is the same basic arrangement as the iconostasis at church. This immediately connects us to church. Next to the Theotokos is an icon of the Conception of the Theotokos showing Ss. Joachim and Ann embracing. My wife, Bethann, has St. Ann for her patron. To the right Christ is the Epitaphios, because St. Joseph of Arimathea is my patron and it was the Burial Service and Lamentation Matins that really converted everyone in our family. Around this central cluster are arranged, in no particular order, icons of the patron Saints of our children, grandchildren, godparents, parents, godchildren, a couple of good friends, nieces, great nieces & great nephews. Some icons do double or triple duty as multiple people share the same patron. We chose to do it this way so our bright corner forms a very visual, permanent prayer list. As we see each person’s patron Saint we are reminded to pray for him or her and ask for their Saint’s intercession as well.

A vigil lamp is hanging from the ceiling, in front of the Cross and the icons of Christ and the Theotokos. This is to honor them. It also calls us to prayer. Our lamp was made by Nick Papas. The icon of St. Nicholas is on our wall as it his his patron and one of Fr. Bonifaces’s patrons, as well.

What I just made, was the cabinet below the icons and lamp. It is made of no VOC melamine from recycled materials, no VOC wheatstraw board, locally harvested and milled poplar bead board and stone tile. This was my first attempt at stone tile installation. Some of the tiles are partly upended. This is to form a plate rail to hold festal icons and prayer cards. The back boards are engraved with daylilies. I took a photograph of one of our daylily blooms and my neighbor and I used his Shopbot to carve it into these boards. There are open spaces around the daylily medallions so we can use 12 Gospels ribbons to tie palms and willows to the icon corner during Great Week.

I chose the daylily motif, because it is especially meaningful to us. This is an excerpt from an entry that I wrote on The King’s Jubilee‘s website:

Daylilies are amazing. They put forth a beautiful bloom and it is gone in a day, only to be replaced the next day with another glorious bloom. Jesus told us to consider the lilies of the field in order to encourage us to have faith in God’s provision for us. This in turn is to encourage us to share what God blessed us with today with others, knowing that God will have new blessings for us tomorrow.

Daylily detail

To be reminded of this as we say our daily prayers is encouraging.

On top of the icon corner are a candlestick, an incense burner, a prayer book, a box containing charcoal and matches. In the top compartment of the cabinet is a box of incense, a lighter, a New Testament, a Festal Menaion (hymns and prayers for the 12 major feasts), a service book and a supply of wicks for the oil lamp. We burn incense in our home as this also calls us to prayer. Incense is present in every prophetic vision of Heaven and was used in the Tabernacle and the Temple and has always been used in the Church. It is always associated with prayer. Using all of our senses in worship and prayer helps us to focus on eternal priorities.

The lower shelves of the cabinet holds other spiritual books and festal icons.

Of course, it does not matter how beautiful or well appointed a bright corner is, if no one stands before it to pray. Lord, teach us to pray!

Cranford vs. the Oil Burner

The first two houses we bought were obvious handyman specials. Our third (current) house is, too, but we just weren’t aware of it, since we were bamboozled by its charm. (Note to self: Never buy a charming house. Buy an ugly one and make it charming enough to bamboozle the next owner.) Our first house was a frame bungalow with gas, gravity flow heat. This means there was basically a slightly oversized stove burner inside a giant tin can in the basement with big, round duct arms stretching out to the perimeter of the house. One of these was right over the workbench. I bumped my head into it regularly. At least that spot was a little bit cushioned by the fiberglas patches the previous owner had placed there. The heat came up through a grate in the center of the house, the living room floor. It was not very effective for heating the house on -20° days, but we were newlyweds, so it hardly mattered.

Our second home had oil heat with hot water radiators. The summer-winter hook-up had been disconnected and we had a gas water heater. The first winter we lived there was fairly mild, and neither of us had grown up with oil, hot water heat, so we didn’t notice any major problems, other than it seemed pretty expensive. The second winter was a different story. It was cold and no matter how we set the thermostat, the house would never get above 52°. We invited friends over quite a bit. The added bodies would warm the house, or, at least, we would be distracted from how cold it was. Our friends would say to each other, “The Coulters invited us over. Time to visit the refrigerator.”

I had this theory about hiring professionals. I didn’t think it was worth it to hire somebody to do something who made more per hour than I did. Of course, I was making very little working in a poultry meat processing plant. I didn’t understand things like overhead, liability insurance  and transportation costs. I also didn’t appreciate the efficiencies involved when someone truly knew what they were doing, as opposed to someone who was reading the totally misnamed Complete Do-It-Yourself Manual, such as myself.

The house was cold. I was ready to try anything. An old plumber had told me that one could clean the electrodes in the burner by pouring a tablespoon of salt over them as it was firing. I figured he was old. He must have done this any number of times and survived. I would give it a shot. He had failed to mention that one should not use an electrically conductive, metal spoon.

So I get a tablespoon out of the silverware drawer and fill it with table salt. I go down into the basement. I gingerly set the spoon on a shelf while I remove the shield above the burner gun. I pick up the spoon and carefully empty it, so that it falls through the arcing electricity between the electrodes or cathodes or whatever you call them. Oops! The spoon made contact with one of them. The electricity travelled up the spoon and threw it against the opposite wall of the basement, with my arm still firmly attached to it.

Bethann heard me crashing against the shelves and various tools falling. She hollered down to me, “Is everything OK?” I answered weakly, “It’ll be fine.” Then I put the cover back on the oil burner and went back upstairs.

That did not solve the problem. In fact, it got worse. I looked at the situation again on another evening. I noticed the boiler was hot and the basement seemed warm, but it wasn’t circulating to the radiators. I surmised that the circulating pump was shot. I drained the system and took off the pump assembly. Sure enough, the impeller was totally shot. I replaced the pump assembly and filled the system. I turned on the heat, expecting a toasty warm house. No such luck.

I was about to give up and call a plumber. Just then, my friend, Jim, stopped by and offered moral support. Bethann said, “Why don’t the two of you go down and take one last look? You know, another perspective and all that.” Jim thought to bring a flashlight. We look around. Everything looks normal. The thermostat is set properly. The fuses are good. Then he shines the light toward the ceiling joists where we see this big valve painted bright red. It had a lever on the side of it and words cast into it to mark three positions: “OPEN” “RUN” “CLOSED”. The lever was in the closed position. I moved it to “RUN” and voila, we had heat in the house. It was the valve to set it on summer or winter for the water heater that used to be attached to it. This explained the smashed impeller. It had been pushing against a closed circulation valve for two years.

So once again, my mom was right. Reading is the key that unlocks every door.

Quinoa, Dates & Almonds

Ingredients:
1/2 cup slivered blanched almonds
8 Medjool dates, pitted and chopped to 1/4″ pieces
1 tablespoon olive oil
1 cup quinoa
1-1/2 cups hot water
2 cups boiling water
1 cinnamon stick
1 bay leaf

Directions:
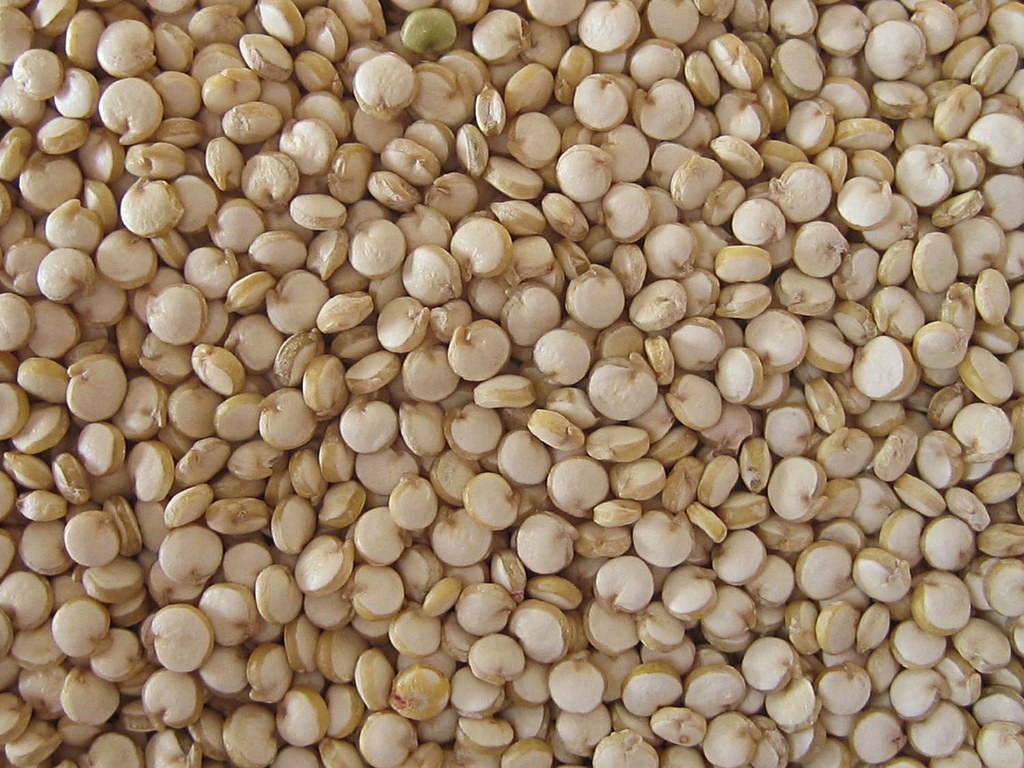
Put quinoa in a small pan or a two cup measuring cup. Add the hot water. Let it soak for at least five minutes. While that’s soaking, pit & dice the dates, fill the teapot and start it heating, get your skillet out and start it heating. Pour off the water from the quinoa using a fine screen strainer to catch any that pour out.
Put the olive oil and the slivered almonds in the hot skillet and lightly toast them. Don’t walk away. They turn black and stinky very quickly; and you’ll have to start over. (voice of experience)
Remove the almonds from the skillet, trying to leave as much of the oil in the skillet as you can.
Pour the quinoa into the skillet. Toast it in the oil just long enough for it to turn slightly golden. This brings out a nutty flavor. Add two cups of boiling water, the diced dates, the cinnamon stick, the bay leaf and the toasted almonds to the skillet. Simmer uncovered, stirring often, until most of the water has been absorbed by the quinoa.
Then cover and remove from the heat. Let it stand for about another five minutes until all the remaining liquid has been absorbed by the quinoa.
Makes four generous servings.

Delicious! Bethann told me it was internet ready, so that’s why I published it.

Rain Barrel Workshop

Terry & Rain Barrel Kit

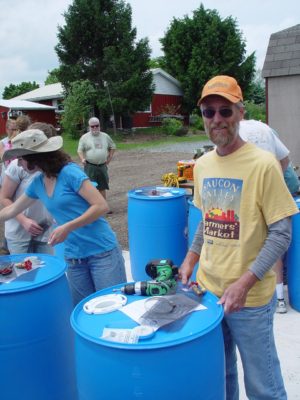
Last Saturday  I went to a rain barrel workshop at Edge of the Woods Nursery put on by the Saucon Creek Watershed Committee. For $35, they provided the tools, the materials and help to build a 55 gallon rain barrel. Rain barrels help slow down the flow of water off of roofs. Suburban sprawl with its McMansions, additional roads, big box stores, big parking lots and lawns have caused many areas to become flood prone that never had this problem before. Rain showers now cause flooding, erosion and water pollution. 70% of water pollution in our lakes and streams comes from rainwater run-off. 80% of water falling on grass lawns runs off. Anything we can do to slow the flow and allow more of this water to filter through plants and soil will help to prevent flooding and pollution.

The simplest step that we can take to slow down the flow of water is to place rain barrels on our downspouts. This reduces the amount of rain flowing across the ground by catching the first 55 gallons in a rain event, saving it to be used on dry days. This reduces the amount of nonpoint source pollution. Rain barrels provide some additional benefits as well. 30% of our water is used for lawns and gardens, on average. If you use captured rainwater to water your garden and lawn you reduce your water and sewer bills and save drinking water resources. Rainwater is better for your plants than city water that has been chlorinated.

Terry & Rain Barrel Kit
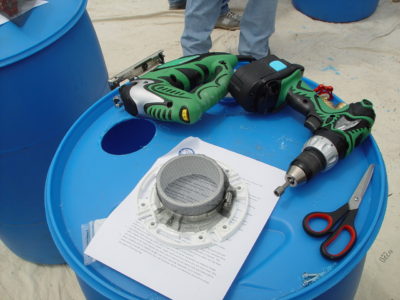
Mosquito screen attached to bottom of PVC toilet flange with duct ring

Now you can buy fancy, good-looking rain barrels from various gardening catalogs and some big box stores; or you can make them fairly inexpensively from a salvaged, food additive barrel and a few parts from the hardware store. The thread taps are pretty expensive, so try to borrow these from a plumber or join a gardening club or watershed association that can buy them corporately to sponsor events like the one I attended on Saturday.

Here’s the recipe:

Ingredients:
1 food grade plastic 55 gallon drum. (SCWC gets theirs from a local recycling center.)
1 PVC toilet drain flange
2 self-tapping 3/4″ hex-top, slot screws
1 dryer vent duct ring
about a square foot of nylon window screen
1 brass 1/2″ hose spigot
1 nylon 3/4″ thread, garden hose coupler
epoxy putty

Tools:
Electric drill
handheld jigsaw
Adjustable wrench
4-5/8″ hole saw
3/4″ garden hose thread tap
13/16″ hole saw
7/16″ drill bit
thread tap for 1/2″ hose spigot
scissors
screwdriver or hex driver bit

Directions:

Top of Rain Barrel Complete

Use 4-5/8″ hole saw to cut a hole in the top of the barrel, leaving enough flat surface around it to place the toilet flange. Attach screen to bottom of flange using the dryer duct ring.  (See photo above.) Trace and cut space on the side of the hole for the tightening screw to fit, so the flange lies flat, screen side down in the barrel.

Drill hole for spigot near the bottom of the side of the barrel using the drill bit. Consider carefully how you want to place this according to how the downspout will enter it, so you will have convenient access to use the water. Tap the threads and screw in spigot. Near the top of the barrel but still on the flat part of the side of the drum, cut the hole with the smaller hole saw for the overflow fitting. Use the larger tap to thread the opening, then screw in the hose coupler. Work the two parts of the epoxy putty together until it is a uniform color. Partially unscrew the spigot and the hose coupler. Work the putty into the threads and retighten, packing it all around to prevent leaks.

Your rain barrel is complete!

Threading the the hole for the spigot

Don’t drink the water from your barrel. If you have asbestos shingles (very old roof) or treated wood roof or a copper roof with a zinc anti-moss strip, do not use the water on edible plants. It is fine for flowers and lawns, though. Clean the bug screen periodically. In the winter, either take it in or leave the spigot open with no hose attached to avoid freezing and thawing from splitting your barrel.

Attach a hose to the overflow with the outlet somewhere like a soaker in a flower bed.
Spigot sealed with epoxy putty

Not Your Grandmother’s Split Pea & Ham Soup

Today, I made a split pea and ham soup to serve 80 men on the street. One of the guys told me that it is so good that the recipe is “internet ready.” That’s the first time I have heard that expression. They used to just tell me that the soup was “bumpin” when it was especially good; a much more graphic descriptor to be sure. In twenty years, even homeless people have become more technologically savvy. So here goes. I will attempt to publish the recipe as well as I can reconstruct it.

Equipment:
1 – 22 quart stainless steel stock pot with a glass lid
1 – much larger aluminum stockpot with no lid
1 – food processor with chopping blade
1 – long handled, heavy duty, industrial kitchen, stainless steel spoon
1 – expendable  dish rag

Ingredients:
1/2 pound dried navy beans
1/2 pound dried pinto beans
1 pound pearled barley
1/2 pound dried kidney beans
3-1/2 pounds green split peas
1 pound yellow split peas
3 ham bones with a fair amount of meat on them
2 yellow onions
raw broccoli, cauliflower and carrots from 1-1/2 party trays
5 cloves garlic
4 Tablespoons salt
10 shakes of black pepper
3 Tablespoons Greek oregano
1/2 teaspoon nutmeg
1/2 teaspoon cinnamon
2 Tablespoons ground sage
3 Tablespoons finely chopped dried basil
water

Cut as much meat as possible off of ham bones and set aside. Put ham bones and dried beans, barley and peas in the 22 quart stock pot with the pot about half full with water. Place directly on stove on high heat. While that is heating up, puree the raw vegetables and onions in the food processor and add to the pot. This will take at least three processor batches. Press the garlic cloves into the pot; that is with a garlic press. Add enough water so that the pot is almost full; still allowing room to stir vigorously. Cover and bring it to a boil. Keep it boiling until all the beans, barley and peas are soft; stirring often with your industrial spoon that is long enough to reach the bottom without burning your fingers. Remove the bones and any strips of fat that are floating. Use a plate to scrape the peas, etc., and any remaining meat off the bones to return to the soup. Discard the bones. Cut up the meat that was set aside and add it to the soup. If there is still room, add water to restore it to the level before you removed the bones.

Put the dish rag in the middle of the bottom of the larger stock pot and add hot tap water. Place stainless stock pot into larger stock pot. The water should come about halfway up the sides of the outer pot; any more and it will bubble and perk out of the pot; any less and it will not transfer enough heat to the soup. This forms a giant double boiler, so you can leave the heat on half and simmer for hours, without worrying about scorching the soup (as long as you don’t let it boil dry and burn your rag – Believe me; it’s not a pleasant smell.).

Add the rest of the spices and stir them in. Leave it on the stove to heat for a few hours; stirring occasionally and making sure that the outer pot has enough water.

When you are ready to go to the street or whatever event you are going to; dump the soup (O, I meant to say pour) into a blue Igloo brand cube style cooler. Igloo is the only brand that doesn’t melt. (Melting cooler is not a flavor you want in your soup!) It will keep your soup piping hot for hours.

Bon Appetit!

Going Native

I made my first trip of the season to Edge of the Woods Native Plant Nursery in Orefield, PA, with my daughter, April, and her three boys. What a wonderful place! They have over 300 species of trees, bushes, plants, flowers and ground covers, all native to this area. Louise and Susan, who own and run the place, are so knowledgeable and helpful that it is well worth the miles out of the way to shop there. But I get ahead of myself.

Why go native? The answer to that is manifold.

The Audubon Society is reporting a rapid decline in bird populations in America, by as much as 80% of some of the most common backyard birds since 1967. Ornithologists attribute this to the disappearance of natural habitat with suburban sprawl with its eradication of the native plant species on which these birds depend for food and shelter. Another problem is the use of chemical herbicides, insecticides and fertilizers that poison birds. So landscaping your yard with native plants and encouraging your neighbors to do the same can recreate attractive habitats for birds. There is no fauna without flora.

Native plants are well adapted to natural conditions, so do not require the artificial life support of chemical salt fertilizers or the ‘protection’ of weed killers or insecticides. This can save you money and make your habitat safer and less polluted. Choose your plants to match your conditions and you don’t need to water much, if at all. This saves water, which saves energy, which is better for the planet and your bank account.

It is easy to propagate most native plants, so, if you are willing to wait, you don’t have to buy so many. The Virginia Sweetspire that I planted last Fall has already put out rooted runners that I was able to transplant to a second location. These plants are not patented or copyrighted, so you can’t get into trouble for propagating them to plant, trade, give or sell.

If you have acreage, and you plan carefully, you can restore habitat to a wild enough state that it sustains itself with little care and provides habitat to native animals of all sorts. You cannot just stop mowing to let land return to the wild. In fact, mowing or plowing can permanently destroy some fragile natural ecosystems. In all of the Great Plains, some estimate that less than 2% are still virgin prairie. I recall as a child in Minnesota that they determined there was less than a quarter of an acre in the whole state that was still virgin prairie. Restoration can only go so far, but wouldn’t it be fun to closely restore a place to how it may have looked, felt and smelled like 400 years ago.

Going native will help you escape the cookie cutter, McMansion look. There are very interesting native plants in every region of the continent. As Europeans started to settle and explore the East coast of America, they were amazed with all the beautiful, native plants. In fact, one of the advantages of going native on the east coast of the US is that you can have a traditional, English, country garden! That’s right! The English were so taken with all the new, exotic plants from North America that they filled their gardens with them in a more naturalizing way than those stuffy, manicured French gardens. It’s a fascinating story. You can read about it in Andrea Wulf’s The Brother Gardeners.

We are using naturalizing, native ground covers, flowers and bushes to eliminate mowing in front of our house. We hope to be able to eat whatever blueberries the birds and the neighbors leave for us, as well.

My First Front Door Designs

Years ago … Scratch that. Decades ago I read several books about building energy efficient homes. One of the authors said that if you don’t do anything else on your home yourself, you need to build your own front door. This led me to buy another book all about doors. Your front door is your greeting to the world; the real world. (For you computer geeks: It is analogous to the introduction to your blog in the cyber-world.)

I built two front doors for our second house, in East Greenville, PA. I built a door out of 7/8″ thick birch lapped and pegged at the corners making a 1-3/4″ thick door. I divided the middle space with the same type of construction from the bottom hinge side bottom corner to about door handle height, then 90 degrees back up to the hinge side. The outer boards were 1/2″ wider than the interior in order to receive the glass. I ordered three pieces of glass from the local, old style, independent hardware store on Main Street. I needed two right triangles and one right trapezoid. Gordy, the owner, said he didn’t know a hypotenuse from an aardvark; so I would have to come over and cut the glass myself. I set the glass in a small bead of clear silicone caulk. The pieces fit with just the right amount of expansion space. I tacked quarter round strips on the inside and varnished the door with three coats of marine spar varnish. It had too much glass for my wife’s comfort with our newsy neighbors. It sat in the basement for a couple of years until it ended up as the back door when we enclosed the back porch to be the new laundry room.

That house was brick and had 34″ wide doors. There are  32″ and 36″ wide exterior doors available commercially, but 34″ would be a special order. The front door continued to deteriorate to the point that it was no longer a question of style or principle that it needed replacing. It was just plain breezy. It was the early 1990s and a halfway decent looking door with glass in it would have cost about $2,000. And it still would have been a cookie cutter, manufactured door. And it would not have included the transom window above it.

So, I set about to design and build a new front door and transom window. It started with the choice of a native wood: poplar. I love the grain with its random green and darker areas. There was a wonderful, family run sawmill just six or seven miles away in Trumbauersville, Carl Hunsberger. Doug Hunsberger let me select the 2″ thick boards for the stiles and rails and the 1″ thick boards for the panel and the trim.

New Front Door Design

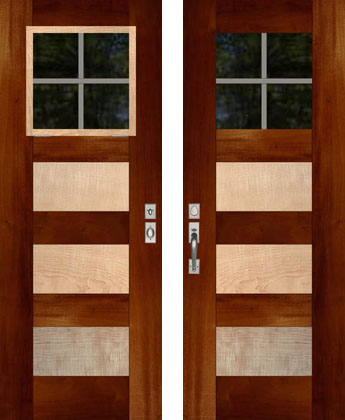
This house is older than our former house and has an even smaller front door. The existing door is OK looking, but is starting to leak a bit. It is thin and does not have insulated glass. It opens into the bottom of the stairs. There is no point in leaving it open and having a screen door, because in the open position it blocks the door into the den and would limit cross ventilation. Bethann wants an operable window in the door itself. This presents an exciting design challenge. Here is what I came up with:

The plan shows the door in mahogany and maple. The local woods that I actually found for the door at Hudock’s Hardwoods about 8 miles from here are purple heart and ash. The door is 29.5″ by 76.5″. The rails and stiles will be made of 1-7/8″x 6″ purple heart, with the exception of the bottom rail, which will be about 8″ wide. The panels will be made of 1-1/8″ thick ash. It will be flush with the interior of the rails and stiles, leaving deep insets on the exterior of the panels.

The window will be 18-1/2″ square, 5/8″ thick tempered, insulated glass with 1″ lead strapping inside and out. This will be set into a 1″ wide ash frame for overall dimensions of 19-1/2″ square. This frame will be hinged on the bottom, so the window can open down and be secured to the inside of the door. I haven’t quite worked out how I want to secure it yet. (I am leaning toward transparent suction cups.) It will have a compression weather stripping gasket in the opening and two wooden toggles to hold it shut. There will be a 17-1/2″ square screen that will attach in the inset space outside the window using spring-loaded pegs in the warmer seasons.

The hinges and lockset will be distressed nickel. The door will be finished with four coats of water based polyurethane, to allow the natural beauty of the wood to shine through. I’ll try to keep you informed as the project progresses.

Thursday was reading night.

In our home, when I was growing up, Thursday night was reading night. This was never, ever announced or even mentioned. It was never enforced. None of us kids were even aware of it. However, it was intentional, consistent and disciplined. My mom, B.J., told me about it when I was in college. I asked her about it, because I had realized that I had never seen any of the TV shows that were on Thursday nights.

My folks wanted to make sure that all four of us kids would enjoy reading and make it a part of our lives. They determined that the best way to do this was by providing opportunity and example. So they chose Thursday. On Thursdays, the television did not get turned on. Mom and Dad would sit in the family room and read. There were built in bookshelves on either side of the fireplace and they were filled with books. Of the approximately forty lineal feet of shelves, half were taken up with reference books: an encyclopedia, dictionaries, thesaurus, legislative manuals and almanacs. The other half were filled mainly with history and biographies, with maybe three feet of philosophical fiction and two feet of family photo albums. My brother and sisters and I each had our personal collections of books in bookcases in our bedrooms.

On Thursdays, we could pretty much do what we wanted. There was a stereo, pool table and fireplace in the basement recreation room. There were games and books there, too. There was a table for puzzles and crafts in the family room. We could play organ in the living room. But we would find our folks quietly reading. I don’t remember being told that we couldn’t turn on the TV. They were reading in front of it. It just wouldn’t seem polite.

We all grew up to be readers.

Years ago, I heard a story on NPR about Iceland being a super-literate country. Thursday was family reading night. All broadcast television would go dark on Thursday evening. It was practically considered one’s civic duty to write at least one book in your lifetime. I haven’t been able to run down the source of this story or substantiate it. Perhaps the internet and cable have erased this distinction there, by now. I did think it was curious that they also chose Thursday. We know a man whose full name is Samuel Shakir Kamees Massad, which translates from the Arabic as: “asked of God to be thankful for Thursday.” To that I say Yes I am!